A version of this column first ran in the Roane County (WV) Reporter and Times Record as part of a gardening series. Support local journalism! Subscribe to your local newspaper. This is one of a series of blogs for new gardeners. Start reading the whole series here: Part 1. 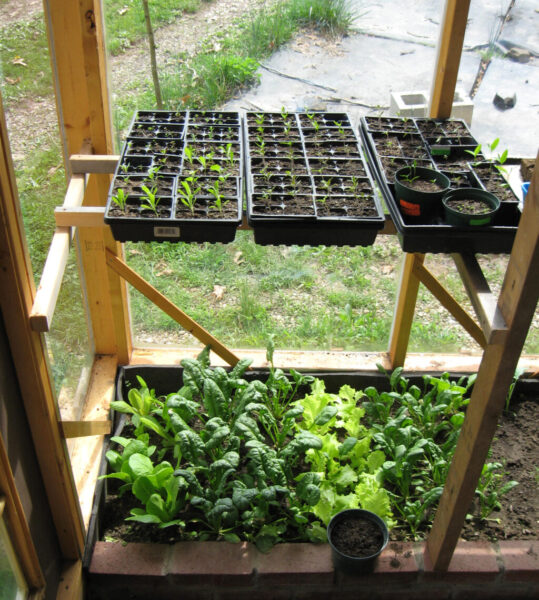
If you have a greenhouse, a cold frame, or even a sunny windowsill, you can start your own vegetable plants in late winter and early spring, ready to transplant into the garden in April or May. You can always buy your seedlings instead, of course, and they aren’t that expensive, but starting your own is satisfying, letting you green your thumb in February or March before you can do much outside. It also gives you a wider selection of varieties.
The first question in getting ready to start this year’s seedlings is where you can do it, where they will get enough light. Some people use artificial light, but since I’ve never done that I have no advice on it. I have a small greenhouse attached to the south wall of my house, as I’ve mentioned in previous columns. This seems pretty ideal to me as it requires no extra energy for heating and I don’t have to suit up and step outside to tend my seedlings on a cold March day.
A cold frame is similar to a greenhouse but much smaller. If you don’t have many seedlings to start, this might be a good solution—and much quicker and cheaper to build than a greenhouse. Perhaps you could build a couple. In an earlier age, people sometimes used hot frames—just like a cold frame except that under the bottom of the growing soil they put fresh manure, which emits heat as it decomposes. A cold frame is just a box built against the south wall of a building—maybe your house. On the bottom is good soil, and the top is a window, hinged so that you can prop it open on a warm day. The window should slant down in front to maximize incoming sunlight. You can throw an old blanket over it on cold nights if you want.
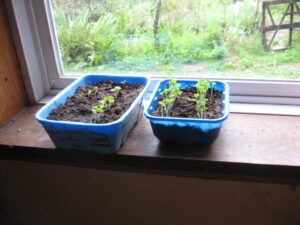
Lacking either of these amenities, you can start a few plants on a windowsill, if you have one with a south-facing aspect. The plus here is that the temperature will be agreeable to most plants all the time. I put my little six-packs and four-packs of seedlings onto trays with sides so I can easily tote them in from the greenhouse on cold nights; my east and south facing windowsills are often crammed with seedlings.
The next question is what to use for pots. I use mushroom containers to start my seeds in, in two or three drills down the surface. These can be labeled, with the variety and the date. You can do more than one variety in one container, with the sections appropriately labeled; but don’t try different species. If one comes up much earlier than the other, you have a problem, with one needing sunlight and air, the other needing maintained humidity. Then after I “prick out” the little seedlings they go into those black plastic six- or four-cell containers, or sometimes the three inch (more or less) round pots. But you can use practically any container, as long as it has some drain holes in the bottom, and won’t fall apart with watering.
For soil, I usually start with a 50/50 mix of clean sand and peat moss; the sand is free-draining while the peat moss retains water. This is a sterile mix, which means the seedlings can’t stay there indefinitely—they won’t grow once they run out of the nutrients packed into the seed—but the plus is that you don’t get weeds. Sometimes I use garden soil or compost but then I may not be sure if the seedlings I see are what I intended, or weeds. But once I prick seedlings out of the initial containers and set each one into its own cell, the mix I use is one fourth each of sand, peat moss, compost and garden soil. I do have to pluck weeds out of the pots after that but it’s easy to see what the desired plant is. Don’t forget to label the containers, using little stickers or whatever else you can figure out. There are lots of potting soil mixes available commercially, some with fertilizer added. Some people don’t move their seedlings; they may plant more than one seed in each cell and pull up all but the strongest.
So you have light, soil, containers—next you need seeds, and water. I will assume you have access to decent water; anything you’re willing to drink is fine for your plants. As for seeds, I ’ve talked about seed shopping and seed saving before, but if you haven’t ordered seeds, I’d say it’s time to get on it. If you prefer to buy seeds locally, they are beginning to appear on shelves now.
So you’ve assembled what you need to start seedlings early: a warm sunny location, containers with drainage, some kind of potting soil, seeds, and water. Or, lacking the sunny spot, you can set everything on a table under lights—not having done this, I don’t know what kind of lights or how far from the seedlings they should be. I prefer to use a raging nuclear inferno as my light source, 94 million miles from my seedlings.
It’s best to get your potting soil appropriately moist before planting. Peat moss especially can take quite a bit of water to moisten up and you may need to rummage through it to get it evenly moist. Do that before putting your seeds in. I lay a pen down and press on it to create a straight furrow to plant in, usually two to a container but sometimes more. Don’t forget to label each container as soon as it’s planted!
Sometimes I need to sprinkle a little additional water over the surface after planting, in which case I let them sit uncovered for a few hours so they won’t have an excessively damp surface. That’s where “damping off” disease comes from, the same conditions that cause diaper rash and certain other unmentionable medical conditions. As soon as the soil is just right—lightly moist but not soggy—put the container (or possibly several of them) inside a plastic bag (the thin shopping bags work well) to keep moisture levels even. If the bag develops a sheen of condensation inside, it’s too moist—open it awhile. Peek inside daily until you see germination beginning. Then you need to open the bag to let more air in; once most of the seedlings are up, put the container in the sun to green up and grow. A few kinds of seeds, planted very shallowly or on the surface, need light to germinate, so for those you should use a clear plastic covering and put them in a bright spot. But most vegetables don’t care. Lettuce needs light but will be direct sown in March—at least, I never start it indoors.
You can find charts online that say how many weeks prior to setting out in the garden you should start various kinds of plants indoors. Often this means, prior to the last spring frost, which is about May 1 here (in Roane County we are in zone 6). But a few things can be put in the garden well before that as they are quite hardy: this includes onions and leeks and the brassicas (broccoli, cabbage, Chinese cabbage, cauliflower, bok choy, brussels sprouts, kale). The brassicas are not as hardy and should only go in a little before the last expected frost, maybe early to mid April. But they are quick to germinate and fast growing so you only start them four weeks ahead of setting them out. Onions and leeks are a bit slower to germinate and extremely slow growing, so they are among the first things I start, in mid February (well, not onions—I only tried that once. I buy sets and just poke them right into the ground in March). I note that this year I’m finding interactive charts online in which you fill in the expected last frost date (I use May 1) and it gives you planting dates.
Leeks and celery are started in February; around March 7 I’ll start columbines, which need to prechill in the fridge for the first three weeks, foxgloves and vervain which need a four week chill, peppers, thyme and lavatera. Also in here are angelica which needs two weeks chill, echinacea and rudbeckia. These are all things which you are supposed to start “six to eight weeks before your last frost.”
Then around March 21, I start marigolds, tomatoes, basil, nasturtiums, zinnias…but note that some of these things can alternatively be started directly outside, after the last frost. Of course, advice on when and how to plant is usually on the seed packet.
The last category is the things I call the whiners, the ones you need to plant outside some time after the last frost. Chief among these is sweet potatoes. They need a long growing season so you can’t just wait till the last frost to get started. I have devoted a whole column to how to do this, but here I will mention that I have already taken two purple sweet potato tips that were sprouting, cut off the sprouting ends, and have them hovering in water in little jars on a windowsill (on my woodstove over cold nights. My woodstove surface doesn’t get that hot and I have a couple of layers of insulation—still I have to move them to the cold windowsill if the water gets too hot). They already have little leaves. Really it’s too early to start sweet potatoes, which tend to get grouchy and go yellow or purple if they have to wait too long for soil—but last year I tried potting up the first couple in soil. That does take up lots more greenhouse space but it worked well.
So—now it’s just about time for me to clean up my greenhouse, find some peat moss and sand, and threaten the squirrels in my garden shed while removing starter containers. If you want to get a jump on the gardening season, it’s time to begin lining up supplies.
Read the rest: Part 1. Part 2. Part 3. Part 4. Part 5. Part 6. Part 7. Part 8. Part 9. Part 10. Part 11. Part 12. Part 13. Part 14. Part 15. Part 16. Part 17. Part 18. Part 19. Part 20. Part 21. Part 22. Part 23. Part 24. Part 25. Part 26. Part 27. Part 28. Part 29. Part 30. Part 31. Part 32. Part 33. Part 34. Part 35. Part 36. Part 37. Part 38. Part 39. Part 40. Part 41.